Wednesday, July 29, 2009

Cupcake Pops

After carving the two birthday cakes (see previous posts), I had plenty of scraps left over. I scooped them into a bowl and refrigerated what was left after my parents picked at them. I knew before I started baking that the scraps would be perfect for making these cupcake pops.

My first encounter with these guys was at my goddaughter's birthday party earlier this year. Her mom, Jasmine, presented us with something probably a hundred times cuter than what you see here. They were almost too cute to eat. Almost. You can find the instructions on how to make them here.

After that day, I wanted to find a reason to make them and found the perfect opportunity when a friend asked me what ideas I had for party favors at a baby shower. I didn't get a chance to take photos when we made them then, but gladly got them this time.


Tuesday, July 28, 2009

Blue & Orange Whimsical Cake

Here is cake numero dos that I made for this past Saturday. This one went to my friend Jeff and his buddies who were also having a joint birthday party. I was quite afraid that no one would eat it and just throw at it each other instead. But alas, my hard work was not in vain. I'm pretty sure Jeff is still running around in circles from his sugar high since he did not want any of the cake to go to waste. [Cut to Jeff in fetal position on the floor getting cake sweats.]

I forgot to mention in the previous post that the cakes were Martha's One Bowl Chocolate Cake as well as her Caramel Buttercream. The one suggestion I have is to mix the cake batter well. It tends to be lumpy and they don't cook out. The buttercream recipes yields 8 cups which I found to fill and crumb coat two 8-inch rounds and one 10-inch round. I had enough to fill the 6-inch but not give it its crumb coat. This cake is a carved 6-inch on top of a carved 8-inch round. I used the same cake recipe and icing to save myself some time for both cakes.

Something I learned in cake decorating class was to use a template for the diamond shaped pieces on the bottom tier. I didn't make a template and don't think I would have preferred to. I wanted all the points to hit at the same spot and because of the geometry of the cake, using a template wouldn't have provided that anyway. So, I basically eyeballed it and divided the cake into even sections and made a slight marking on the top. Then, I just cut each piece by hand making sure each piece fit as I went.

Monday, July 27, 2009

Pink & Lime Green Polka Dot Cake


Since I took the cake decorating class, I've been eager to test my new skills. In fact, I was a little too eager and promised 2 cakes to 2 different people for the same day. You'll read about the 2nd cake in the next post.

My god daughter, Makayla, and her two sisters had a joint birthday party so I offered to bake the cake as a gift. Makayla wanted a pink cake with lime green polka dots, so I used that as a starting point. It was also mentioned that the cake should be "whimsical and girly". In my mind, I felt the things I learned in decorating class would be perfect for this cake. In the course of looking for ideas, I decided to add the bow topper and the ribbon roses, both which looked easy enough to tackle for creating my first cake alone.

Sunday, July 12, 2009

2009 Cheesecake Challenge

It's nearly time for the Cheesecake Challenge again! This year, our competition will be held at Parkside Aquatic Park in San Mateo on Saturday, August 8th and our theme ingredient is chocolate.

Last year, we had a great time with an amazing group of tasters and judges. This year, we are hoping that we will have the honor of having the same crowd plus more. For the results from last year, go here.

Our bakers, so far, are: Elisha, Cynthia, Marvin, Jasmine, Jeff and myself. All creative and talented people, so the competition is going to be tough! Since the theme ingredient is chocolate, it is a good thing we are having the competition at a park to be able to run off the instant pounds we are surely going to gain.

In the last two competitions, we've had 4 judging categories: taste, appearance, texture and originality. We've decided to add one more category: crust. It's such a huge part of the cheesecake experience, it is a surprise that we did not have this category to begin with.

If you would like to join us, please reply "Yes" on the official evite here. Everyone is welcome to come! There will be plenty of cheesecake to taste.

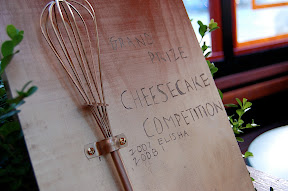
Whose name will be added next to the coveted Golden Whisk Award?


Sunday, June 14, 2009

Topsy Turvy Cake


I've been doing research on baking and cake decorating classes in the Bay Area for a little while now, and I think I've found a gem. Combined with what people had to say on Yelp and his website, signing up for a class with Baking Arts in SOMA was a no brainer. Your teacher, Richard, works out of his beautiful loft and keeps class sizes small. He provides everything you need and gives each student plenty of attention. Along with this Topsy Turvy Cake, some of his other classes are Whimsical Cupcakes, Gumpaste flowers, Choux Pastry, etc. So, there is plenty to choose from.

This cake was lots of fun to make. Richard had baked and chilled the cakes for us already. He assembled the top tier for us but showed us how to carve the bottom tier and cover it in fondant. The most time intensive portion of the class was rolling out the fondant and making the decorations. Richard walks you through the whole way but towards the end lets you have free creative reign over your cake. He even gave us a brilliant idea to make the daisies. To give the centers a bit of texture, roll out the fondant and put a piece of tulle down over it. Then, take a round cutter and press down over the tulle into the fondant. Gently peel away the tulle and you'll have the center of the daisy. Simply just dab a little water onto the back and attach to the flower.

Taking this class has definitely encouraged me to try making more cakes with fondant. It's very time intensive (and the fondant doesn't taste like much more than sugary clay), but the product is beautiful.

Tuesday, February 24, 2009

Strawberry Puff Pastries

I've been on a bit of an unintentional hiatus, mainly because I've discovered that baking as a hobby is quite the pocket drainer.

Anyhow, I had some left over puff pastry in the freezer and the idea of these Strawberry Puff Pastries sprang to mind. As a child, my mom would treat me to a strawberry pastry at Grain D' Or (now Anderson's Bakery) every once in a while. To this day, those pastries bring back pleasant memories so I wanted to create something similar. After doing a little research, I used a recipe for Sunny Side Up Apricot Pastries, from Baking with Julia, as a starting point.

Monday, January 5, 2009

Vanilla Pound Cake


I've been trying to break in my Bundt cake pan for some time now. I guess I just never got around to finding a recipe but I got Baking with Julia by Dorie Greenspan for my birthday and I found the recipe for Vanilla Pound Cake.

The only real experience I've had with eating pound cake is Sara Lee's and I loved it. You know, the frozen stuff that you get in the aluminum foil pan. That stuff that you're supposed to let thaw, or even microwave. Well, I never did. I'd eat it straight out of the freezer. I liked it better that way and I couldn't just stop at one 1-inch slice. I'd have to have 2 of those. Probably more like 3.

I can't tell you what this poundcake tastes like frozen [yet]. I just sliced it up and put half of it in the freezer this morning. [The other half of it goes to Mom, if it makes it there.] However, I can say that at room temperature this cake is dense but moist and full of buttery flavor. I ate it alone as well as with a scoop of Peanut Butter Cup Ice cream [post follows]. Both good. The cake keeps for a few days at room temperature, or if you like it frozen, like me, it keeps wrapped for a month.


Vanilla Pound Cake

Baking with Julia by Dorie Greenspan

3 cups all-purpose flour
2 teaspoons baking powder
1/2 teaspoon salt
2 sticks (8 ounces) unsalted butter, at room temperature (I only had one stick of unsalted and one salted)
2 cups sugar
3 large eggs, at room temperature, whisked to blend
1 cup milk, at room temperature
2 teaspoons, pure vanilla extract

Position a rack in the lower third of the oven and preheat the oven to 350 degrees F. Butter and flour (I used a cake release grease. See WD-40 for cakes) a 10-inch tube pan or other 12-cup decorative pan with a center tube.

Sift the flour, baking powder, and salt together onto a sheet of waxed or parchment paper; reserve.

Put the butter into the bowl of a mixer fitter with the paddle attachment (or work with a hand-held) mixer and beat at medium speed until smooth. With the machine running, add the sugar in a steady stream. Stop the machine and scrape down the paddle and the sides of the bowl with a rubber spatula. Continue to beat at medium speed until the mixture is very light and flufy, about 4 to 5 minutes.

With the mixer still at medium speed, begin to add the eggs in small additions, about a tablespoon at a time. If the mixture become watery or shiny, stop adding the eggs and beat at an increased speed just until it smooths out. When the batter has come together again, decrease the speed to medium and continue adding the eggs, scraping down the paddle and sides of the bowl from time to time; it will take 3 to 4 minutes to incorporate the eggs. The mixture is properly combined when it appears white, fluffy and increased in volume.

Reduce the mixer speed to low and add the flour mixture and the milke alternately--4 additions of flour, 3 of milk--scraping the paddle and bowl frequently and mixing until the batter is smooth after each addition. Add the vanilla and mix just to blend.

Baking the Cake: Spoon the batter into the prepared pan and smooth the top with a spatula. Bake for 55 to 65 minutes, or until wooden toothpick inserted in the center of the cake comes out clean. Transfer the cake to a cooling rack, remove the pan, and cool to room temperature. The cake is best served in very thin slices (I did not do this. Mostly because I am greedy).

Wednesday, December 24, 2008

2008 Christmas Cookies

Starting in college, when I was too broke to buy real presents for my friends, I made an assortment of cookies instead as gifts.  And since they were such a big hit the first year, I keep making them year after year.   These cookies are probably the reason why I began to love baking so much.  

This year, I made 3 types of treats: TKO's, Gingerbread Men and Chocolate Rum Balls.  

TKO's are Thomas Keller's version of the Oreo cookie.  They have a white chocolate cream sandwiched between two crumbly chocolate wafers.  When I tasted the wafers by themselves, I felt that they were a little salty and bitter but when they were put together with the very sweet white chocolate cream they became something to rave about.  

The Gingerbread Men came from a Soft Gingerbread Cookie recipe that I used for last year's cookie assortment.   I decided to use the same recipe again because I loved the flavor of the spices and the soft texture of the cookies.  I rolled out the dough about 1/8" on a floured counter and cut out the yummy men with a cutter.  Rolling the dough any thicker didn't work because it rises and spreads making an unattractive gingerbread man.  

Since I was serving these cookies at a party (where booze is always necessary), I thought that Chocolate Rum Balls would be the perfect treat.  They were very easy to make and look especially festive with the Christmas sprinkles.   The recipe I used by Alex Guarnaschelli uses chocolate sprinkles but I decided to mix things up and use red and green sprinkles with snow flakes and candy canes as well as just plain ol' cocoa powder.  Remember to keep the balls in an airtight container.  They harden pretty fast.  You can find the recipe here.

Here are the recipes for the other two:

TKO's
from The Essence of Chocolate
makes about 3 dozen sandwich cookies

Cookie:

1 1/2 cups plus 3 Tbsp all purpose flour
3/4 cup sugar
3/4 cup plus 1 Tbsp unsweetened cocoa powder
1/2 tsp baking soda
1 1/2 tsp salt
15 Tbsp unsalted butter, cut into 3/4" cubes, at room temperature

Filling:
1/2 cup heavy cream
8 oz. white chocolate, chopped

1. 
For the Filling: In a small pan, bring the cream to a boil. Remove from heat and add the chocolate. Let
 stand for 1 minute, then whisk to melt the chocolate until smooth. Transfer to a small bowl, and let stand for 6 hours to thicken up.

2. 
For the Cookies: In a large mixing bowl, combine the flour, sugar, cocoa, baking soda, and salt, and mix on low speed. With the mixer running, add the butter, a piece at a time. The mixture will be dry and sandy at first, but over 2 minutes, will form pebble-sie pieces that start to cling together. Stop the mixer and transfer the dough to your board.

3. Preheat oven to 350F. Seperate dough into 2 pieces. Roll each piece of dough between 2 pieces of plastic wrap or parchment paper to 1/8" inch thick. Using a fluted cutter, cut into rounds. Scraps can be pieced together and rolled out again. Place 1/2" apart on baking sheets lined with Silpat liners or parchment paper.


4. Bake for 12-15 minutes, rotating halfway through baking. Remove and cool in the pan for 5 minutes, then transfer cookies to a cooling rack. Cool completely.


5. To Assemble: Lightly whip the white chocolate cream to aerate and fluff up. Transfer filling to a pastry bag fitted with a 1/4" plain tip. Pipe about 1 1/2 tsp in the center of half the cookies. Top with another cookie to sandwich. Gently press down until the cream comes to the edges.

6. Cookies can be stored in a container for up to 3 days. Loosely cover.


Gingerbread Men
adapted from the Big Soft Ginger Cookies on allrecipes.com

Cookie: 
2 1/4 cups all-purpose flour
2 teaspoons ground ginger
1 teaspoon baking soda
3/4 teaspoon ground cinnamon
1/2 teaspoon ground cloves
1/4 teaspoon salt
3/4 cup margarine, softened
1 cup white sugar
1 egg
1 tablespoon water
1/4 cup molasses
2 tablespoons white sugar

Icing: 
1 cup confectioners' sugar
2 teaspoons milk
2 teaspoons light corn syrup

1. Preheat oven to 350 degrees F (175 degrees C). Sift together the flour, ginger, baking soda, cinnamon, cloves, and salt. Set aside.

2. In a large bowl, cream together the margarine and 1 cup sugar until light and fluffy. Beat in the egg, then stir in the water and molasses. Gradually stir the sifted ingredients into the molasses mixture.  Roll the dough out on a floured surface, until 1/8" thick.  Cut out cookies using a gingerbread man cutter.  Place each on a sheet pan or cookie sheet about 1 inch apart.  

3. Bake for 8 to 10 minutes in the preheated oven. Allow cookies to cool on baking sheet for 5 minutes before removing to a wire rack to cool completely. 

4.  While the cookies are cooling, whisk together all icing ingredients in a small bowl until smooth.  When cookies are completely cool, decorate the cookies as you wish.  Allow the icing to dry and harden and store cookies in an airtight container.

Monday, November 3, 2008

Red Velvet Cake

For my birthday this weekend, I wanted to have some people over for a low-key night with cake, ice cream and board games. The cake: red velvet, the ice cream: Dreyer's Slow Curned French Vanilla, the board game: Cranium.

I used Sylvia's Red Velvet Cake recipe. No, not because it had my name, but because the reviews were really good on the website and I've seen her make this exact cake on Emeril Live.

You need a lot of red food coloring to give the cake it's signature color. 2 ounces to be exact. Since there is so much, I think I would consider buying an organic food coloring for next time. I added an extra stick of butter on accident. Yes, really "on accident". I didn't notice until I was making the cream cheese frosting and thought, "Doh! I hope I didn't ruin the cake." Well, I thought the cake turned out to be really moist so I might consider adding that extra stick of butter each time I make it. The other changes I made were that I used 8 inch pans instead of 9 inch and I didn't add any pecans in the frosting.

This might be my favorite cake now! OM NOM NOM...

Tuesday, October 7, 2008

Cornmeal Pancakes

I'm back! After a 3 week vacation in Europe, I am back to blogging!

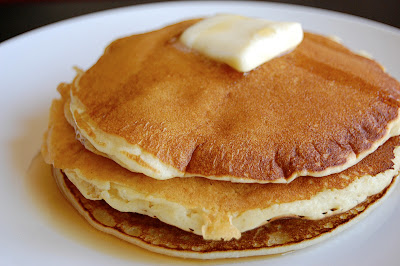
This post has waited quite awhile to be published. I originally tried this recipe for Cornmeal Pancakes back in August. For me, I loved that the pancakes, by themselves, were slightly sweetened only needing just a little bit of warmed syrup and a dab of butter to make them complete.

I also tried the recipe again this past weekend, tweaking it a bit to use the ingredients I had on hand instead of having to run out and shop.

The original recipe, found on Epicurious, asked for sour cream but all I had in the house was fat free vanilla yogurt. Since I used that, I also cut the vanilla extract down to half and added a dash of heavy cream as well. The pancakes came out just like they did the first time.

Cornmeal Pancakes
from epicurious.com

1 cup plus 2 tablespoons all purpose flour
1/3 cup fine yellow cornmeal
2 tablespoons sugar
1 teaspoon baking powder
1/2 teaspoon baking soda
1/4 teaspoon salt
2 large eggs
3/4 cup sour cream
3/4 cup milk
1/4 cup vegetable oil
1/2 teaspoon vanilla extract

Sift flour, cornmeal, sugar, baking powder, baking soda, and salt into large bowl. Whisk eggs in medium bowl to blend; whisk in sour cream, milk, oil, and vanilla. Gradually add liquid mixture to dry ingredients, whisking just until blended.

Heat griddle or heavy large skillet over medium heat. Working in batches, brush griddle lightly with melted butter. Pour batter by 1/3 cupfuls onto griddle. Cook until bottoms brown, about 4 minutes. Turn pancakes over and cook until second sides brown, about 2 minutes.

Serve with warmed maple syrup and butter.